Thursday, July 6, 2017

Building Qt 4.8.7

Many already have probably heard about Qt by now so I will be terse in saying how cool it is and yet maybe too overwhelming, except for big and complex applications. What matters most in this post is how to using on a Solaris 11.3 (GA / Release) desktop. There are no pre-built binaries, except to some well known Solaris (honorable) sites which attempt to address the gaps in software availability to Solaris. The problem with those sites is that they somewhat lag behind or require to much stuff to setup their distribuition infrastructure. In face of that, I always prefer to build the software myself under a controlled environment I know better and is 100% free of security issues.

I will build it with GNU tools and compilers, targeting both 32 and 64 bits. The reason for not using Developer Studio at first is because software out there is more frequently distributed with the GNU build automation tools in mind so that the probability of a successful build is higher at first. Most of the GNU tools furnished with Solaris 11.3 (GA / Release) seems fairly updated, except for GNU build automation the themselves, which I recommend updating beforehand. Furthermore, the GCC packaged with Solaris is version 4.8.2, which means that it only fully supports C89 and C++03, so all bets are off for anything newer than that. Fortunately, this legacy version 4.8.7 of Qt don't require anything else than that. I know that C++03 is already history, but nevertheless it is there in case you need it. By the way, C is also history and yet it is still wildely prevalent in so many areas.

I learned the hard-way that the following Solaris 11.3 packages must be installed in order to maximize features and gracefully build Qt:

  • unicode
  • developer/icu
  • library/icu
  • image/graphviz
  • x11/library/xtrans

I thought that building Qt shouldn't be difficult (and in the end I confirm that) but that's not so unless you have all the necessary information at your fingertips, which, at least in case of Solaris, isn't that so. Despite the available information on its website the task wasn't easy at first and I had to pass to a series of trials and errors until I get there. As I believe noone should deserve that, as usual, I share my knowlege with the rest of the world on the belief that the contribution would make more people happier and think about doing the same more often.

In building Qt you'll have the ability to enable some features deemed as plugins but some of them must preexist installed on the Solaris system, either pre-packaged or manually built similarly to this task. Some of these features already package in Solaris will work with no issues, others won't because they are outdated or because of the way they were built and/or made available in the system. One example is SQLite version 3. The package available to Solaris is the 32-bits version 3.8.8.1 with certain features disabled or not available. For Qt that seems to be not much of a problem, but for Firefox it certainly is. Thus, as SQLite is so prevalent, this is a pre-requisite that's better to address right-away to avoid subsequent limitations or unexpected shortcomings, that is, update / install SQLite (by manually building both the 32 and 64 bits enabling all its features) right-away! The build work-flow is similar to the one on this post!

At the time of this writing, first, download the source-code tarball for version 4.8.7. You should look for the 230 Mb file named qt-everywhere-opensource-src-4.8.7.tar.gz (using git is not a good choice, as the Solaris version is outdated and in the end you'll only get more trouble, unless you have already taken care of manually updating it). Now follow my recommedation on GNU - Build preparation in order to prepare a sane environment for the task. Next to this previous step, fine-tune the generated setenv executable script in the root of the corresponding version subtree to consider an updated SQLite (as well as any other pre-requisite software) installation, for instance:

...
# Insert below, other PATH and PKG_CONFIG_PATH settings.
# Follow my PATH building suggestion.

 
PKG=/opt/sqlite-3.19.3/gnu$BITS
if [[ -d "$PKG" ]] ; 

then

  CFG=$PKG/bin
  ! [[ "$PATH" =~
"$PKG" ]] && \
    export PATH=$CFG:$PATH

  CFG=$PKG/lib/pkgconfig

  PCP=${PKG_CONFIG_PATH:+:$PKG_CONFIG_PATH}
  ! [[ "$PCP" =~ "$PKG" ]] && \
    export PKG_CONFIG_PATH=$CFG$PCP

 
fi

...

In fact, the above will be part of a more complete environment setup (the setenv script) which I reference on some of the previous links. The relevant ajustments to the script are:

#
# Other PATH and PKG_CONFIG_PATH settings.
# Put in reverse order of dependency.
#

extend-env /opt/sqlite-3.19.3
extend-env /opt/tcl-8.5.19
extend-env /opt/automake-1.15
extend-env /opt/autoconf-2.69
extend-env /opt/m4-1.4.18
extend-env /opt/libtool-2.4.6

  
From the ZFS perspective, the "sane" environment is:

$ DS=...
$ zfs list -o name -t all -r $DS/software/Qt |sed 's,$DS,...,'
NAME
.../software/Qt
.../software/Qt/qt-4.8.7
.../software/Qt/qt-4.8.7@source
.../software/Qt/qt-4.8.7-gnu32
.../software/Qt/qt-4.8.7-gnu32@start
.../software/Qt/qt-4.8.7-gnu32@config
.../software/Qt/qt-4.8.7-gnu32@build
.../software/Qt/qt-4.8.7-gnu64
.../software/Qt/qt-4.8.7-gnu64@start
.../software/Qt/qt-4.8.7-gnu64@config
.../software/Qt/qt-4.8.7-gnu64@build


The qt-4.8.7 is the ZFS dataset to where the tarball was extracted.
Right after extraction the @source ZFS snapshot is taken.
The qt-4.8.7 dataset is made readonly, hum..., just in case.
The qt-4.8.7-gnu32 and qt-4.8.7-gnu64 are ZFS clones of @source.
Before the @start snapshots, certain "adjustments" are required.

First, the files qmake.conf and qplatformdefs.h .
They are at mkspecs/build-type/ subdirectories of the clones' mountpoints.
You may note in mkspecs/ a symbolic link called default, but ignore it.
As I'm building for GNU, build-type will be solaris-g++ and solaris-g++64.
The adjustments are:
In .../qt-4.8.7-gnu32/mkspecs/solaris-g++/qmake.conf:
(core2 is a particular optimization, not a requirement)

22: QMAKE_CFLAGS   = -march=core2 -std=gnu89
34: QMAKE_CXXFLAGS = -march=core2 -std=gnu++03

45: QMAKE_INCDIR   = /usr/include
46: QMAKE_LIBDIR   = /usr/lib


In .../qt-4.8.7-gnu32/mkspecs/solaris-g++/qplatformdefs.h:

124: // typedef unsigned int useconds_t;
125: // extern "C" int usleep(useconds_t);
126: // extern "C" int gethostname(char *, int);


In .../qt-4.8.7-gnu64/mkspecs/solaris-g++-64/qmake.conf:

QMAKE_CFLAGS   = -m64 -march=core2 -std=gnu89 ...keep rest...
QMAKE_CXXFLAGS = -m64 -march=core2 -std=gnu++03 ...keep rest...
QMAKE_INCDIR   = /usr/include

QMAKE_LIBDIR   = /usr/lib/64
Second, config.tests/x11/xinput/xinput.cpp.
The adjustment is:
 42 // #ifdef Q_OS_SOLARIS
 43 // #error "Not supported."
 44 // #else
 ...
 59 // #endif

Now take the @start snapshots and configure each build-type.

NOTE
The next configure commands' arguments are non-negotiable:
(otherwise the build will result unsuccessful)

-prefix (must be present, but its value can vary)
-no-webkit (must be present; Solaris lacks pthread_getattr_np())
-qt-libpng (must be present; Solaris headers and libs are misplaced)
-R (must be present; for each extra-system feature)

Be aware of the -qtnamespace setting. If you set it (but its value cannot be Qt) it will probably cause further impacts on any source-code, source-code generators and other libraries that may not count on such namespace value. Hence, it seems better to leave it off.

Furthermore, certain arguments that are not listed, must not be! For instance, -xvideo must not be listed due to a bug in configure. Similarly, declaratives and scripts arguments must not be listed. In general, for the build to succeed it's preferably not to rely on system options, that is, prefer the -qt-... alternatives. Finally, make sure you exclude portions of the machine instructions-set not supported by the particular hardware, such as: -no-3dnow, -no-sse4.1 and so on...

For GNU32:
$ ./configure -prefix /opt/qt-4.8.7/gnu32 -opensource -qt-sql-sqlite -xmlpatterns -no-webkit -multimedia -audio-backend -phonon -phonon-backend -svg -no-sse4.1 -no-sse4.2 -no-avx -no-neon -no-3dnow -qt-zlib -qt-libtiff -qt-libmng -qt-libpng -qt-libjpeg -openssl -make libs -make tools -make examples -make demos -make docs -R/opt/sqlite-3.19.3/gnu32/lib -nis -cups -iconv -pch -dbus -gtkstyle -no-nas-sound -opengl -sm -xshape -xsync -xinerama -xcursor -xfixes -xrandr -xrender -mitshm -fontconfig -xinput -xkb -glib -platform solaris-g++

For GNU64:
$ ./configure -prefix /opt/qt-4.8.7/gnu64 -opensource -qt-sql-sqlite -xmlpatterns -no-webkit -multimedia -audio-backend -phonon -phonon-backend -svg -no-sse4.1 -no-sse4.2 -no-avx -no-neon -no-3dnow -qt-zlib -qt-libtiff -qt-libmng -qt-libpng -qt-libjpeg -openssl -make libs -make tools -make examples -make demos -make docs -R/opt/sqlite-3.19.3/gnu64/lib -nis -cups -iconv -pch -dbus -gtkstyle -no-nas-sound -opengl -sm -xshape -xsync -xinerama -xcursor -xfixes -xrandr -xrender -mitshm -fontconfig -xinput -xkb -glib -platform solaris-g++-64

An initial licensing terms is presented:
(accept it by entering yes)

This is the  Open Source Edition.

You are licensed to use this software under the terms of
the Lesser GNU General Public License (LGPL) versions 2.1.
You are also licensed to use this software under the terms of
the GNU General Public License (GPL) versions 3.

Type '3' to view the GNU General Public License version 3.
Type 'L' to view the Lesser GNU General Public License version 2.1.
Type 'yes' to accept this license offer.
Type 'no' to decline this license offer.

Do you accept the terms of either license?


Each build target will output with a corresponding header:
 
This target is using ... (solaris-g++).
Build type:    solaris-g++
Architecture:  i386
 or
This target is using ... (solaris-g++-64).
Build type:    solaris-g++-64

Architecture:  x86_64

But both will continue their output as follows:
Debug .................. no
Qt 3 compatibility ..... yes
QtDBus module .......... yes (run-time)
QtConcurrent code ...... yes
QtGui module ........... yes
QtScript module ........ yes
QtScriptTools module ... yes
QtXmlPatterns module ... yes
Phonon module .......... yes
Multimedia module ...... yes
SVG module ............. yes
WebKit module .......... no
JavaScriptCore JIT ..... To be decided by JavaScriptCore
Declarative module ..... yes
Declarative debugging ...yes
Support for S60 ........ no
Symbian DEF files ...... no
STL support ............ yes
PCH support ............ yes
MMX/3DNOW/SSE/SSE2/SSE3. yes/no/yes/yes/yes
SSSE3/SSE4.1/SSE4.2..... yes/no/no
AVX..................... no
Graphics System ........ default
IPv6 support ........... yes
IPv6 ifname support .... yes
getaddrinfo support .... yes
getifaddrs support ..... yes
Accessibility .......... yes
NIS support ............ yes
CUPS support ........... yes
Iconv support .......... sun
Glib support ........... yes
GStreamer support ...... yes
PulseAudio support ..... yes
Large File support ..... yes
GIF support ............ plugin
TIFF support ........... plugin (qt)
JPEG support ........... plugin (qt)
PNG support ............ yes (qt)
MNG support ............ plugin (qt)
zlib support ........... yes
Session management ..... yes
OpenGL support ......... yes (Desktop OpenGL)
OpenVG support ......... no
NAS sound support ...... no
XShape support ......... yes
XVideo support ......... yes
XSync support .......... yes
Xinerama support ....... yes
Xcursor support ........ yes
Xfixes support ......... yes
Xrandr support ......... yes
Xrender support ........ yes
Xi support ............. yes
MIT-SHM support ........ yes
FontConfig support ..... yes
XKB Support ............ yes
immodule support ....... yes
GTK theme support ...... yes
SQLite support ......... qt (qt)
OpenSSL support ........ yes (run-time)
Alsa support ........... no
ICD support ............ no
libICU support ......... yes
Use system proxies ..... no

After a while (around 15 min on my slow machine) one sees:
(it's safe to completely ignore most of the configure instructions;
ZFS is an exceeding file-system dispensing reconfigure and confclean)

Qt is now configured for building. Just run 'gmake'.
Once everything is built, you must run 'gmake install'.
Qt will be installed into /opt/qt-4.8.7/...
To reconfigure, run 'gmake confclean' and 'configure'.

Now take the @config snapshots and build each build-type:
(this takes time on my slow machine; enough for a good nap, at least!)

$ gmake

Now take the @build snapshots and install each build-type:
(assuming that the right ZFS datasets were already mapped under /opt)

$ sudo gmake install

Now take the @release snapshots of each build-type installed.
The final results on the building machine are as follows:

$ DS=rpool/VARSHARE/qt-4.8.7
$ zfs list -o name -t all -r $DS
NAME
rpool/VARSHARE/qt-4.8.7
rpool/VARSHARE/qt-4.8.7/gnu32
rpool/VARSHARE/qt-4.8.7/gnu32@release
rpool/VARSHARE/qt-4.8.7/gnu64
rpool/VARSHARE/qt-4.8.7/gnu64@release


Now, if you plan to distribute the binaries, you have to package or create a tarball for each build-type. In general, if nothing more than the sub-structure under /opt is enough (which is the case), then the simplicity of a tarball is much more appealing.

Once the binaries are in place (integrated into /opt), it's just a matter of adjusting the PATH environment variable as usual:

$ export PATH=/opt/qt-4.8.7/gnu64/bin:$PATH

$ cd /opt/qt-4.8.7/gnu64/bin
$ ls -1
assistant
designer
lconvert
linguist
lrelease
lupdate
moc
pixeltool
qcollectiongenerator
qdbus
qdbuscpp2xml
qdbusviewer
qdbusxml2cpp
qdoc3
qhelpconverter
qhelpgenerator
qmake
qmlplugindump
qmlviewer
qt3to4
qtconfig
qtdemo
qttracereplay
rcc
uic
uic3
xmlpatterns
xmlpatternsvalidator


$ cd /opt/qt-4.8.7/gnu64/lib
$ ls -1 *.so.?.?.?
libphonon.so.4.4.0
libQt3Support.so.4.8.7
libQtCLucene.so.4.8.7
libQtCore.so.4.8.7
libQtDBus.so.4.8.7
libQtDeclarative.so.4.8.7
libQtDesigner.so.4.8.7
libQtDesignerComponents.so.4.8.7
libQtGui.so.4.8.7
libQtHelp.so.4.8.7
libQtMultimedia.so.4.8.7
libQtNetwork.so.4.8.7
libQtOpenGL.so.4.8.7
libQtScript.so.4.8.7
libQtScriptTools.so.4.8.7
libQtSql.so.4.8.7
libQtSvg.so.4.8.7
libQtTest.so.4.8.7
libQtXml.so.4.8.7
libQtXmlPatterns.so.4.8.7


You should make sure that the GUI Style is GTK+.

$ qtconfig


Et voilà!

$ qtdemo
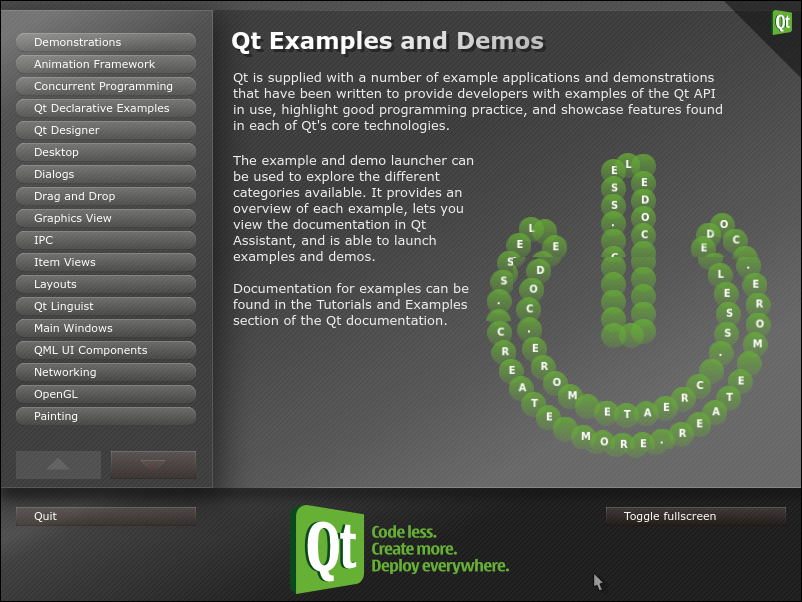
   
Now it's possible to follow the baby steps of:
How to Develop Qt Applications in the Oracle Developer Studio IDE

NOTE
Fortunately, you can also use NetBeans 8.2 hassle-free.
Version 8.1 doesn't integrate well, perhaps requiring some tricks...
 

Wednesday, July 5, 2017

GNOME Startup Application

Simply put, a GNOME Startup Application is a script or binary file that is execute upon the GNOME Desktop launch, more specifically, as part of the gnome-session establishment. The gnome-session connects to the X infra-structure at which point X resources become availble to the session and its children.

The startup applications should be used to startup things that require (or are desired upon) a graphical desktop or X infrastructure already running. That's the main purpose and difference from other more familiar startup files such as /etc/profile and .profile.

For instance, setting a GNOME Startup Application may be the only solution to autostart a virtual machine only upon logging into the desktop GUI. Note that this is different from the intrinsic VirtualBox Autostart feature.

The GNOME Startup Applications feature follows the FreeDesktop.org Specifications, topic Autostart specification, preferably the latest. Basically, a file with the extension .desktop has to be create at ~/.config/autostart/ or at /etc/xdg/autostart/ respectively to a single user or all users. The local directory has higher precedence in case of equally named files in both places. Furthermore, both these search locations could be respectively customized by setting $XDG_CONFIG_HOME and / or $XDG_CONFIG_DIRS.

The easiest way setting it is through the GUI itself via the menu sequence System | Preferences | Startup Applications or by invoking the command
gnome-session-properties, both of which invoke the same dialog:


By clicking the Add button one configures another entry, such as:


Getting the following as a result:


Alternatively, you can create yourself the file with the following contents:

$ cat .config/autostart/zenity.desktop

[Desktop Entry]
Type=Application
Exec=zenity --about

Hidden=false
X-GNOME-Autostart-enabled=true
Name[en_US]=Zenity
Name=Zenity
Comment[en_US]=The Zenity about box
Comment=The Zenity about box


The above file content can be greatly customized.
For instance, depending on the situation, add: Path and Terminal.
For the details, better check the following: Desktop Entry Specification.

During logon, the example above will display the following dialog at or near (0,0), the top-left corner, as there's no parent window for it to center in (the application should position itself, support the --geometry argument or something similar to that):


By looking at Zenity maintenance page, there's no plan to address centering:


It may be convenient to have certain executable shell scripts being launched by this tool as well, but there's one gotcha about the Exec key and the .desktop file: environment variables are not directly supported. Hence, to launch the script ~/.autostart-script1 the following is required:

$ cat .config/autostart/.autostart-script1.desktop

[Desktop Entry]
Type=Application
Exec=bash -c "$HOME/.autostart-script1" --
Hidden=false
X-GNOME-Autostart-enabled=true
Name[en_US]=Script1
Name=Script1
Comment[en_US]=Test script #1
Comment=Test script #1


Sunday, July 2, 2017

Killing (zapping) X

Killing (or zapping) the X server used to be easy, by simply pressing the "magic" key combination of Ctrl+Alt+Backspace. But that doesn't seem work anymore in my Solaris 11 GNOME Desktop. In fact, strictly speaking, the X default is like this. Killing the X server with such key combination is not supposed to be globally active by default. But traditionally it's been always possible to ("easily") override this and that's a convenient setting, excepting it would affect all users.

After being frustrated for a while, looking for a bunch legacy X information on how to re-enable the option for killing X via the Ctrl+Alt+Backspace key sequence I finally found how, but accidentaly, though! It's "hidden", as to say, in the GNOME Desktop keyboard settings, more precisely at System | Preferences | Keyboard dialog shown below:


By clicking at Options a secondary dialog pops-up and then it is just a matter of finding and marking the appropriate option checkbox as shown below:


This setup is much easier than the more traditional X environment hard way, but unfortunately it's not well documented, not even at the all mighty Destop Adminstrator's Guide. This cost me much time finding it my own way. Appart from that, the good news are that it will handle the operation on a per-user basis, which is certainly much better than traditional system-wide setting.

That's it!


As complementary information and discussion, I'll just add that the guidance offered at the Destop Adminstrator's Guide, that is, linking from 90-zap.conf in /etc/X11/xorg.conf.avail/ to /etc/X11/xorg.conf.d/ does not solve the issue as expected, probably because this solution not suited to a GNOME Desktop scenario as it probably is to a "plain" X scenario. This somewhat puzzeled me at first because I though for a moment that my xorg.conf file in /etc/X11/, which was automatically generated by nvidia-settings, could have some conflicting setting. I also thought about some possible conflict with Compiz but I quickly discarded it by testing without it on a separate virtual machine.

I have to say that by looking at the X legacy information I've got to the setxkbmap command which provided a partially successful, imperfect, solution as its effect wasn't surviving across reboots. By opening a terminal and issuing the following sequence, for that session only, I was able to kill X:

$ setxkbmap -option "terminate:ctrl_alt_bksp"
$ setxkbmap -query
rules:      base
model:      dellusbmm
layout:     br,br,us
variant:    nodeadkeys,,
options:    terminate:ctrl_alt_bksp,grp:shifts_toggle

 
The above partial solution opened up perspectives on enabling this setting on a per-user basis, a much more convenient approach. So I started thinking on somehow hooking this statement to one of the usual start-up scripts, such as .profile or .bashrc. I quickly realized that the setxkbmap command only worked under an already established X session, which existence I immediately associated to the DISPLAY environment variable being set to scripts, but that's so only to .bashrc which is the interactive and implies a parent session. So I've tried adjust things as follows:

$ tail .bashrc
...
 
if ! [[ ${DISPLAY-NO_X} = NO_X ]] ;
then
  if [[ -z $(setxkbmap -query |grep ctrl_alt_bksp) ]] ; 
  then
    # Just need to be set by the first interactive shell
    setxkbmap -option "terminate:ctrl_alt_bksp" 
  fi
fi
...

 
But unfortunately that's not a solution either because .bashrc isn't automatically run upon login. That was a dead-end: i) .profile ran at login but had no DISPLAY set; ii) .bashrc had DISPLAY set but didn't run a login! Perfect! :-( Finally I understood that the problem was sitting between these two contexts was the gnome-session, which is the one that connects to X and sets DISPLAY, and which is invoked by login. Of course, all later regular GNOME Desktop terminal sessions are children of gnome-session and that explains my initial perception of problem and shows that there's no solution independent of GNOME as well. That's where the GNOME startup files get in the scene: if a script has to be run upon a gnome-session launch they must be invoked as GNOME Startup Applications, which adheres to the Desktop Application Startup Specification.

If the options above aren't satisfactory the only alternatives that seem to work safely and relatively close to them are:
  1. Perform: # svcadm restart gdm
    (essentially a # kill -TERM `cat /var/run/gdm.pid`)
       
    or
     
  2. Try manually killing X from outside a gnome-session:
    If possible, preferably switch to a virtual console (vtn).
    (press a Ctrl+Alt+Fn keys combination, where 2 ≤ n ≤ 6)
    As root, execute: # pkill X
    Wait of try forcing switch back to the graphics mode.
    (press Ctrl+Alt+F7 keys combination)
NOTE
These work-arounds are not as convenient as the zap key combination because they require even more interactions.

By the way, under VirtualBox the virtual console keys combination seems to be Hostkey+Fn. But curiously you may have to "shake it" one time or so, that is, press Hostkey+F2, Hostkey+F7 and Hostkey+F2, until you see the vt2 virtual console prompt.
   

Monday, June 19, 2017

PATH building

Throughout UNIX configuration activities is not uncommon to have to set up environment variables for a variety of reasons, most notably for several variants of PATH searches, such as PATH, LD_LIBRARY_PATH, PKG_CONFIG_PATH and many others. In order to generalize and simplify the process it's not also uncommon to take advantage of shell scripts and in doing so the process can also be made more flexible and dynamic in terms of building these PATHs by testing for a particular system support condition.

NOTE
In building PATHs that support multiple components, between every two components there's a certain delimiter character which may vary according to different usage conventions. Sometimes the delimiter may be a ':', other times it may be a ';', but it's not necessarily restricted to these two.
For instance, let's say that on a developer system one needs to set PKG_CONFIG_PATH according to some previously known "packages" (for instance, libffi and sqlite), but constrained to the availability of these "packages" on that particular system. The essential idea of a shell script excerpt to address this scenario could be:

PKG=/opt/libffi-3.2/gnu32
if [[ -d "$PKG" ]] ; 

then

  CFG=$PKG/lib/pkgconfig
  PCP=${PKG_CONFIG_PATH:+:$PKG_CONFIG_PATH}
  ! [[ "$PCP" =~ "$PKG" ]] && \
    export PKG_CONFIG_PATH=$CFG$PCP


fi

PKG=/opt/sqlite-3.19.3/gnu32
if [[ -d "$PKG" ]] ; 

then

  CFG=$PKG/bin
  ! [[ "$PATH" =~
"$PKG" ]] && \
    export PATH=$CFG:$PATH

  CFG=$PKG/lib/pkgconfig
  PCP=${PKG_CONFIG_PATH:+:$PKG_CONFIG_PATH}
  ! [[ "$PCP" =~ "$PKG" ]] && \
    export PKG_CONFIG_PATH=$CFG$PCP


fi


In the above code, note the following points:
  
  • I'm assuming BASH as it may have been readily apparent.
      
  • I test beforehand for the existence of each "package" directory.
    ( if [[ -d ... ]] ; )
      
  • I test if the path component has already been previously set.
    ( ! [[ "$PKG_CONFIG_PATH" =~ ... ]] && ... )
      
  • If PKG_CONFIG_PATH isn't set or is empty, don't add the delimiter ':'.
    I could have done this each time to avoid future copy/paste "bugs".
    ( ${PKG_CONFIG_PATH:+:$PKG_CONFIG_PATH} )

NOTE
By the way, the above "packages" are just two out of a bunch more prerequisites to build a more recent Firefox version under a Solaris 11.3 GA / Release :-D
NOTE
In particular, the kind of the above script is typically not executable and is intended to be run as an argument to the source command in order to integrate the settings to an existing session. As such, on this kind of script, case needed, use return instead of exit.
A slightly more elaborated and fully woking example of this technique can be found on another post I've written about GNU - Build preparation.
   

Wednesday, June 7, 2017

TeX - Installation

Everybody should know about TeX, but in case you do not, perhaps you could learn more at the TeX Users Group and AMS TeX Resources | Freeware and find out that you should be looking for TeX Live after all.

You may need TeX for various reasons, from willing to write articles, papers and so on... to ultimately manually building the latest version of GCC.

A quick install document is provided, but I felt it was just partially helpful as you may agree (to some extent) by looking at my personal notes that follow.

The most convenient installation method, although very time-consuming (perhaps about 6 to 8 hours) on a severely slow or limited connection, is over the net by downloading a "bootstrap" installation script written in Perl with an optional more user-friendly GUI interface in Tcl / Tk. As such, before anything else you need to make sure you have the right Perl and Tcl / Tk packages already installed on your system. They are:
 
  • tcl-8
  • tk-8 
  • perl-512
  • perl-tk-512

Among them, the last one is not installed by default:

$ pkg info -r perl-tk-512
          Name: library/perl5/perl-tk-512
       Summary: CPAN Perl Tk module
   Description: perl-tk provides ... (GUI) widgets ...
                develop desktop applications such as buttons,
                menu, canvas, text, frame, label etc.
      Category: Development/Perl
         State: Not installed
     Publisher: solaris
       Version: 804.31
 Build Release: 5.11
        Branch: 0.175.3.0.0.30.0
Packaging Date: August 21, 2015 04:57:26 PM
          Size: 8.30 MB
          FMRI: .../perl-tk-512@804.31,...


Thus, install it:

# pkg install perl-tk-512
           Packages to install:  1
       Create boot environment: No
Create backup boot environment: No

DOWNLOAD     PKGS      FILES    XFER (MB)   SPEED
Completed     1/1    763/763      2.7/2.7  166k/s

PHASE                                          ITEMS
Installing new actions                       781/781
Updating package state database                 Done
Updating package cache                           0/0
Updating image state                            Done
Creating fast lookup database                   Done
Reading search index                            Done
Updating search index                            1/1
Updating package cache                           2/2


By the way, you may need to know that the man pages are not integrated by default, so in case you decide you need them, even without integrating them into the man system, you can explicitly specify their path; for instance:

$ man -M /usr/perl5/5.12/man Tk::Photo

As an alternative you may also consider manually building newer versions of Perl and Tcl / Tk, which can help avoid some issues as I shall present soon.

Now you should look for a suitable TeXLive download mirror, but you'd better check if a given mirror offers the release you're insterest on. The mirror autodirection feature fails to do so, probably assuming that eventually all mirrors would be in sync when they actually aren't. For instance, today, June 2017, there are mirrors still offering the old 2016 release, instead of the more updated 2017 one. Unfortunately, this requires a manual verification, which may be tedious until you manually find the right one. Visit the mirrors list page, pick a reasonable candidate and access it for manual verification. Once there, go to:
systems/texlive/tlnet
Then download to /tmp the bootstrap installation script for Unix:
install-tl-unx.tar.gz
Extract it and check its version:

$ cd /tmp
$ tar xf install-tl-unx.tar.gz
$ cd install-tl-...
$ head -1 release-texlive.txt
TeX Live (http://tug.org/texlive) version 2017

In the above example I was lucky to have found what I was looking for right at the first shot, but, as said, that may not be the case if you are on a "far abroad region"...

Assuming I have picked out the right mirror by verifying the downloaded bootstrap installation script from it, the next step is to fix a small but annoying bug in the GUI version of it.

In the tar.gz-extracted directory-tree pay attention to the following files:

$ pwd
/tmp/install-tl-...

$ ll tlpkg/installer
total ...
-rw-r--r--  ...  tl-tray-menu.ini
-rwxr-xr-x  ...  tl-cmd.bat
-rw-r--r--  ...  install-tl.html
-rw-r--r--  ...  COPYING.MinGW-runtime.txt
-rw-r--r--  ...  texlive.png
-rw-r--r--  ...  installer-options.txt
-rw-r--r--  ...  install-menu-wizard.pl
-rw-r--r--  ...  install-menu-perltk.pl
-rw-r--r--  ...  ctan-mirrors.pl
-rw-r--r--  ...  install-menu-text.pl
-rw-r--r--  ...  tracked-install.pl
-rwxr-xr-x  ...  config.guess
drwxr-xr-x  ...  xz
drwxr-xr-x  ...  wget


Fixing the GUI

You must create a copy of texlive.png converted to a supported BMP version (the default version 4 isn't supported!), because neither the PNG, nor the JPG options are in fact supported by the installed Tcl/Tk versions available under Solaris, unfortunately. Check the ImageMagick suite homepage for more detail, in particular, the supported types (formats).

$ convert texlive.png bmp3:texlive.bmp

Next you need to change the below highlighted portions of the indicated source lines of the install-menu-perltk.pl. You must comment out (#) the initial requirement for the PNG module and substitute references to "png" for "bmp" instead.

$ grep -n -i png install-menu-perltk.pl
24:require Tk::PNG;
206:  my $img = $fl->Photo(-format => 'png',
207:  -file => "$::installerdir/tlpkg/installer/texlive.png");


Upon completing the fix you'll have:

$ grep -n -i png install-menu-perltk.pl
24:#require Tk::PNG;
206:  my $img = $fl->Photo(-format => 'bmp',
207:  -file => "$::installerdir/tlpkg/installer/texlive.bmp");


Next you need to setup a a site-wide (local) installation directory. By default this is /usr/local but under Solaris this translates to /opt. The newly created /opt subdirectory should intially be given a mode and group to which the (non-root) regular user performing the installation belongs to and be granted write access, of course.

# mkdir -m 775 /opt/texlive
# chgrp staff /opt/texlive

Another detail to pay attention to at this point is the umask setting. One should consider if it's Ok or not the default 0022 mask. Perhaps some other mask value would be more appropriate, for instance, 002, which you would keep granting write access to the group (staff as in the above example) previously set on /opt/textlive:

$ umask 002

Now you should finally be ready to start an installation attempt:
(again, note that I don't do it as root for trying to reduce risks)
(note that mirror-url must end with /systems/texlive/tlnet)

$ cd /tmp/install-tl-...
$ ./install-tl --location ...mirror-url... -gui=perltk

You should see something similar to:


You should select the desired Binary system(s):


Then you should select the desired Installation collection(s):
(suggestion: English, French, German and your native language)


Then you should select the previously created /opt/texlive directory as the TEXTDIR (the main TeX directory) and accept all other defaults, except perhaps for the Default paper size, and then click on Install TeX Live button. Make sure your system won't sleep or hybernate after a while and take your time in doing other amazing things! :-)

NOTE
In case, the installation fails, my personal experience isn't reassuring. My attempts to resume from a failed install never succeed in picking up from where the failure last happened. I had always to painfully start over from the scratch!

Upon a successful installation the last messages you'll see in the download dialog as in the below image will show the duration and the a few post-installation instructions:


 The post-installation instructions are:
Welcome to TeX Live!

Documentation links: /opt/texlive/2017/index.html
The TeX Live web site (https://tug.org/texlive/)
contains updates and corrections.

TeX Live is a joint project of the TeX user groups around the world;
please consider supporting it by joining the group best for you.
The list of groups is on the web at https://tug.org/usergroups.html.

Add /opt/texlive/2017/texmf-dist/doc/man to MANPATH.
Add /opt/texlive/2017/texmf-dist/doc/info to INFOPATH.
Most importantly, add /opt/texlive/2017/bin/i386-solaris
to your PATH for current and future sessions.
NOTE
You should repeat the previously described "Fixing the GUI" procedure on the contents of /opt/texlive/2017/tlpkg/installer to make sure it will work correctly as needed.
You should now put the desired binary, man and info path in their respective PATHs as needed and if you didn't follow my previous suggestions, then you may attempt to manually adjust ownership and mode troughout the entire /opt/texlive directory-tree.

$ export PATH=/opt/texlive/2017/bin/x86_64-solaris/:$PATH

Now, the Testing the Installation documentation topic may be useful. It can be found at file:///opt/texlive/2017/texmf-dist/doc/texlive/texlive-en/texlive-en.html#x1-380003.5.

$ tex --version
TeX 3.14159265 (TeX Live 2017)
kpathsea version 6.2.3
Copyright 2017 D.E. Knuth.
There is NO warranty.  Redistribution of this software is
covered by the terms of both the TeX copyright and
the Lesser GNU General Public License.
For more information about these matters, see the file
named COPYING and the TeX source.
Primary author of TeX: D.E. Knuth.


LaTeX

$ latex sample2e.tex
... pdfTeX ... (TeX Live 2017) (preloaded format=latex)
 restricted \write18 enabled.
entering extended mode
(/.../2017/texmf-dist/tex/latex/base/sample2e.tex
LaTeX2e <2017-04-15>
Babel <3 .10=""> and hyphenation patterns ... loaded.
(/.../2017/texmf-dist/tex/latex/base/article.cls
Doc... Class: article 2014/09/29 v1.4h Std LaTeX ...
(/.../2017/texmf-dist/tex/latex/base/size10.clo))
No file sample2e.aux.
(/.../2017/texmf-dist/tex/latex/base/omscmr.fd) [1] [2] [3]
(./sample2e.aux) )
Output written on sample2e.dvi (3 pages, 7484 bytes).
Transcript written on sample2e.log.


Now there's a small caveat: Solaris provides a more updated library libXaw.so.7 than the hard-coded libXaw.so.5 required by xdvi script which ultimately invokes the xdvi-xaw binary.

$ file /opt/texlive/2017/bin/x86_64-solaris/xdvi-xaw
/.../2017/bin/x86_64-solaris/xdvi-xaw: ELF 64-bit ... AMD64


$ ldd /opt/texlive/2017/bin/x86_64-solaris/xdvi-xaw
    libXaw.so.5 =>     (file not found)
    libXmu.so.4 =>     /usr/lib/64/libXmu.so.4
    ...

    libc.so.1 =>     /lib/64/libc.so.1
    libxcb.so.1 =>     /usr/lib/amd64/libxcb.so.1
    ...

    libXau.so.6 =>     /usr/lib/64/libXau.so.6
    libXdmcp.so.6 =>     /usr/lib/64/libXdmcp.so.6
    ...

    libXevie.so.1 =>     /usr/lib/64/libXevie.so.1
    libXss.so.1 =>     /usr/lib/64/libXss.so.1


If not amended, this will cause the following issue:

$ xdvi sample2e.dvi
ld.so.1: xdvi-xaw: fatal: libXaw.so.5: open failed:
No such file or directory
Killed


The more updated available libraries are found on:

$ file /usr/lib/libXaw.so.7
/usr/lib/libXaw.so.7: ELF 32-bit ... 80386 ...


$ file /usr/lib/64/libXaw.so.7
/usr/lib/64/libXaw.so.7: ELF 64-bit ... AMD64 ...


You may notice that there are symbolic links to them, perhaps in an attempt to prevent issues such as the above. But, in this case, they are not sufficient. Unfortunately, for now I'm not aware of any adjust other than the following somewhat crude work-around:

# cd /usr/lib
# ln -s libXaw.so libXaw.so.5

# cd /usr/lib/64
# ln -s libXaw.so libXaw.so.5

Now I can continue with the post-installation verifications:
(in spite of all File|... menu options of xdvik exhibit failure)

$ xdvi sample2e.dvi
Warning: Missing charsets in String to FontSet conversion


PDFLaTeX

$ pdflatex sample2e.tex
... pdfTeX ... (TeX Live 2017) (preloaded format=pdflatex)
 restricted \write18 enabled.
entering extended mode
...
Output written on sample2e.pdf (3 pages, 136717 bytes).
Transcript written on sample2e.log.


$ evince sample2e.pdf &


$ gs -r96 sample2e.pdf -c quit


XeTeX

# d1=/.../2017/texmf-var/fonts/conf/texlive-fontconfig.conf
# d2=/etc/fonts/conf.d/09-texlive.conf
# ln -s $d1 $d2

# fc-cache -fsv
...
/var/cache/fontconfig: cleaning cache directory
fc-cache: succeeded


$ xetex opentype-info.tex
... XeTeX ... (TeX Live 2017) (preloaded format=xetex)
 restricted \write18 enabled.
entering extended mode
...
Output written on opentype-info.pdf (2 pages).
Transcript written on opentype-info.log.